Hello world!
Welcome to WordPress. This is your first post. Edit or delete it, then start writing!
Welcome to WordPress. This is your first post. Edit or delete it, then start writing!
Welcome to WordPress. This is your first post. Edit or delete it, then start writing!
I thought I would post this to save some people’s sanity when using a Mikrotik router and port forwarding ports 80 and 443 from the public IP to a private IP address.
Open Winbox, and go IP, Services.
then you can see www and www-ssl, double click each and update the default port from 80 or 443 (8080 and 4443 work just fine).
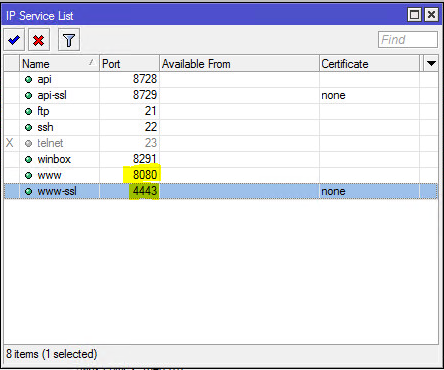
Then you can properly portfw those ports internally.
Thanks!
Mike
proxmox v5.4 buildbook with infiniband and FusionIO cards and Ceph
first: fix the sources.list
two commands:
rm /etc/apt/sources.list.d/pve-enterprise.list
and
echo “deb http://download.proxmox.com/debian/pve stretch pve-no-subscription” > /etc/apt/sources.list.d/pve-install-repo.list
The actual process
Download all the files. Here’s the cheatsheet, so you don’t have to waste plenty of time on this (it creates a folder /home/temp where all the files are downloaded automatically:
Code:
mkdir /home/temp && cd /home/temp && \
wget -O iomemory-vsl_3.2.16.1731-1.0.tar.gz https://www.dropbox.com/s/up8hrkmk6lhyc6f/iomemory-vsl_3.2.16.1731-1.0.tar.gz?dl=1 && \
wget -O fio-common_3.2.16.1731-1.0_amd64.deb https://www.dropbox.com/s/pd2ohfaufhwqc34/fio-common_3.2.16.1731-1.0_amd64.deb?dl=1 && \
wget -O fio-firmware-fusion_3.2.16.20180821-1_all.deb https://www.dropbox.com/s/kcn5agi6lyikicf/fio-firmware-fusion_3.2.16.20180821-1_all.deb?dl=1 && \
wget -O fio-preinstall_3.2.16.1731-1.0_amd64.deb https://www.dropbox.com/s/iq7pefjdgwtuzf1/fio-preinstall_3.2.16.1731-1.0_amd64.deb?dl=1 && \
wget -O fio-sysvinit_3.2.16.1731-1.0_all.deb https://www.dropbox.com/s/g39l6lg9of6eqze/fio-sysvinit_3.2.16.1731-1.0_all.deb?dl=1 && \
wget -O fio-util_3.2.16.1731-1.0_amd64.deb https://www.dropbox.com/s/57huby17mteg6wp/fio-util_3.2.16.1731-1.0_amd64.deb?dl=1 && \
tar zxvf iomemory-vsl_3.2.16.1731-1.0.tar.gz && cd iomemory-vsl-3.2.16.1731
Get all the tools you need in order to compile the drivers from source (please be aware that at the time of reading the kernel is likely to be newer):
Code:
apt-get install gcc fakeroot build-essential debhelper rsync pve-headers dkms
Create the DKMS config file and edit it via the command:
Code:
nano /home/temp/iomemory-vsl-3.2.16.1731/root/usr/src/iomemory-vsl-3.2.16/dkms.conf
The content of the DKMS will be:
Code:
MAKE=”‘make’ DKMS_KERNEL_VERSION=$kernelver”
CLEAN=”‘make’ clean”
BUILT_MODULE_NAME=iomemory-vsl
BUILT_MODULE_LOCATION=”
PACKAGE_NAME=iomemory-vsl
PACKAGE_VERSION=3.2.16.1731
DEST_MODULE_LOCATION=/kernel/drivers/block
AUTOINSTALL=”Yes”
REMAKE_INITRD=yes
Prepare the source for being compiled, compile the drivers and load the drivers into the kernel:
you may need to install specific headers if this next step fails:
example apt install pve-headers-4.15.18-12-pve
Code:
cp -r /home/temp/iomemory-vsl-3.2.16.1731/root/usr/src/iomemory-vsl-3.2.16 /usr/src/ && \
mkdir -p /var/lib/dkms/iomemory-vsl/3.2.16/build && \
ln -s /usr/src/iomemory-vsl-3.2.16 /var/lib/dkms/iomemory-vsl/3.2.16/source && \
dkms build -m iomemory-vsl -v 3.2.16 && \
dkms install -m iomemory-vsl -v 3.2.16 && \
modprobe iomemory-vsl
Install all utilities and firmware:
Code:
cd /home/temp && \
dpkg -i fio-firmware-fusion_3.2.16.20180821-1_all.deb fio-util_3.2.16.1731-1.0_amd64.deb fio-sysvinit_3.2.16.1731-1.0_all.deb fio-common_3.2.16.1731-1.0_amd64.deb
You may need to compile the drivers for the other kernels present on the system:
Code:
ls /var/lib/initramfs-tools | sudo xargs -n1 /usr/lib/dkms/dkms_autoinstaller start
Next step get the Infiniband working!
run this
apt-get -y install debhelper autotools-dev dkms zlib1g-dev python wget quilt python-libxml2 swig dpatch graphviz chrpath
then install the drivers/utils
wget http://www.mellanox.com/downloads/ofed/MLNX_EN-4.2-1.0.1.0/mlnx-en-4.2-1.0.1.0-debian9.0-x86_64.tgz
tar xzvf mlnx-en-4.2-1.0.1.0-debian9.0-x86_64.tgz
cd mlnx-en-4.2-1.0.1.0-debian9.0-x86_64
./install –skip-distro-check
it will warn that other packages will be removed, choose Y and hit enter.
once it completes. another round of installs and reboots!
sudo apt-get install opensm infiniband-diags librdmacm-dev libibverbs-dev libmlx4-dev
add these lines to /etc/modules
mlx4_ib
ip_ipoib
rdma_ucm
THEN reboot.
Reboot the OS and make sure the device is attached after the reboot by running
Code:
fio-status -a
Format the device according to your needs and enjoy.
Using Mellanox Infiniband 40gb adapters with Proxmox v5.x
apt-get -y install debhelper autotools-dev dkms zlib1g-dev python wget quilt python-libxml2 swig dpatch graphviz chrpath
wget http://www.mellanox.com/downloads/ofed/MLNX_EN-4.2-1.0.1.0/mlnx-en-4.2-1.0.1.0-debian9.0-x86_64.tgz
tar xzvf mlnx-en-4.2-1.0.1.0-debian9.0-x86_64.tgz
cd mlnx-en-4.2-1.0.1.0-debian9.0-x86_64
./install –skip-distro-check
then run this:
wget http://download.proxmox.com/debian/pve/dists/stretch/pvetest/binary-amd64/pve-headers-4.13.4-1-pve_4.13.4-25_amd64.deb
dpkg -i pve-headers-4.13.4-1-pve_4.13.4-25_amd64.deb
and reboot!
THEN… do this:
From the software side
sudo apt-get install opensm infiniband-diags librdmacm-dev libibverbs-dev libmlx4-dev
Then add these to /etc/modules via nano /etc/modules and pasting these lines in.
mlx4_ib
ip_ipoib
rdma_ucm

Then reboot.
The actual process
Download all the files. Here’s the cheatsheet, so you don’t have to waste plenty of time on this (it creates a folder /home/temp where all the files are downloaded automatically:
Code:
mkdir /home/temp && cd /home/temp && \
wget -O iomemory-vsl_3.2.16.1731-1.0.tar.gz https://www.dropbox.com/s/up8hrkmk6lhyc6f/iomemory-vsl_3.2.16.1731-1.0.tar.gz?dl=1 && \
wget -O fio-common_3.2.16.1731-1.0_amd64.deb https://www.dropbox.com/s/pd2ohfaufhwqc34/fio-common_3.2.16.1731-1.0_amd64.deb?dl=1 && \
wget -O fio-firmware-fusion_3.2.16.20180821-1_all.deb https://www.dropbox.com/s/kcn5agi6lyikicf/fio-firmware-fusion_3.2.16.20180821-1_all.deb?dl=1 && \
wget -O fio-preinstall_3.2.16.1731-1.0_amd64.deb https://www.dropbox.com/s/iq7pefjdgwtuzf1/fio-preinstall_3.2.16.1731-1.0_amd64.deb?dl=1 && \
wget -O fio-sysvinit_3.2.16.1731-1.0_all.deb https://www.dropbox.com/s/g39l6lg9of6eqze/fio-sysvinit_3.2.16.1731-1.0_all.deb?dl=1 && \
wget -O fio-util_3.2.16.1731-1.0_amd64.deb https://www.dropbox.com/s/57huby17mteg6wp/fio-util_3.2.16.1731-1.0_amd64.deb?dl=1 && \
tar zxvf iomemory-vsl_3.2.16.1731-1.0.tar.gz && cd iomemory-vsl-3.2.16.1731
then nano /etc/apt/sources.list and make sure you have this line
deb http://download.proxmox.com/debian buster pve-no-subscription
Next, run this command
apt-get install gcc fakeroot build-essential debhelper rsync pve-headers dkms
do uname -a
then install the pve-headers-yourkernelversion
example: apt install pve-headers-5.0.15-1-pve
Create the DKMS config file and edit it via the command:
Code:
nano /home/temp/iomemory-vsl-3.2.16.1731/root/usr/src/iomemory-vsl-3.2.16/dkms.conf
contents will be:
MAKE=”‘make’ DKMS_KERNEL_VERSION=$kernelver”
CLEAN=”‘make’ clean”
BUILT_MODULE_NAME=iomemory-vsl
BUILT_MODULE_LOCATION=”
PACKAGE_NAME=iomemory-vsl
PACKAGE_VERSION=3.2.16.1731
DEST_MODULE_LOCATION=/kernel/drivers/block
AUTOINSTALL=”Yes”
REMAKE_INITRD=yes
Prepare the source for being compiled, compile the drivers and load the drivers into the kernel:
Code:
cp -r /home/temp/iomemory-vsl-3.2.16.1731/root/usr/src/iomemory-vsl-3.2.16 /usr/src/ && \
mkdir -p /var/lib/dkms/iomemory-vsl/3.2.16/build && \
ln -s /usr/src/iomemory-vsl-3.2.16 /var/lib/dkms/iomemory-vsl/3.2.16/source && \
dkms build -m iomemory-vsl -v 3.2.16 && \
dkms install -m iomemory-vsl -v 3.2.16 && \
modprobe iomemory-vsl
Install all utilities and firmware:
Code:
cd /home/temp && \
dpkg -i fio-firmware-fusion_3.2.16.20180821-1_all.deb fio-util_3.2.16.1731-1.0_amd64.deb fio-sysvinit_3.2.16.1731-1.0_all.deb fio-common_3.2.16.1731-1.0_amd64.deb
You may need to compile the drivers for the other kernels present on the system:
Code:
ls /var/lib/initramfs-tools | sudo xargs -n1 /usr/lib/dkms/dkms_autoinstaller start
Reboot the OS and make sure the device is attached after the reboot by running
Code:
fio-status -a
ACL3
GhostPractice
Summation
Worldox
PC Law
WordLX
TimeMatters
InForm
Amicus Attorney
Philips Speech Processing
Dragon Naturally Speaking
Divorcemate
Copitrak
Worksite
Primafact
Here at Polar Networks we understand that everyday new technologies emerge and increase in complexity and pace; therefore, it is beneficial for you and your dental office to have someone to rely on who is fully acquainted with the latest and most reliable computer hardware and equipment specific to your industry.
You may be using several different software programs to manage appointments, store patient personal data, review X-rays and check email. Polar Networks works together seamlessly with all practice management software vendors to ensure the best experience for your dental office. We Support ABELdent, Tracker, Dentrix and many more.
We support common dental imaging vendors such as Kodak , Sidexsis , Myray Raymage, Shick by Sirona, CADI and many more.
We take your important patient and business data seriously. We will ensure that your data will be protected and your backups be tested to ensure instant restorability in the event of an emergency or disaster.
Welcome to WordPress. This is your first post. Edit or delete it, then start writing!
In this guide I will show you practical steps (with pictures) how to setup MySQL Replication in Master – Slave mode on either CentOS or Ubuntu server. I believe MySQL replication technique is not expert-only stuff but even newbies can learn and use this technique. In case if you didn’t know yet, let’s start with a short introduction about what is it.
MySQL Replication is a method to create synced backup of your MySQL database. You can call it hot backup or a backup that’s always up-to-date and ready-to-use in case the main one crashes or down. Master – Slave replication is just one of available mode that is commonly used in many production system. So this tutorial is the simplest one (one master will send information to a single slave) which newbies can follow and use it at their production servers. Better take backup than not!
What’s the main purpose of MySQL Replication? It is to create a redundant MySQL server setup which is also very useful in terms of Data Security, Fail-over Solution, Database Backup from Slave, Analytics (to analyze it without using the main database), etc.
What you’ll need:
What I use in this tutorial:
First thing first, you have to install MySQL server on both Master and Slave server. In case if you haven’t installed it yet, you can follow my previous articles:
Do not forget to note down the password of MySQL root user.
FYI, you can also have MySQL server installed via Control Panel software like Vesta CP at Master server while install ONLY MySQL server manually on Slave.
Before we step up, I use these imaginary IPs which you can replace with your own IPs:
Master server: 111.111.111.111
Slave server: 222.222.222.222
Do these steps on Master Node:
Step 1 – Edit MySQL configuration file using your favorite text editor like vi or Nano. Command below uses Nano editor:
|
1
2
3
4
5
|
## On Ubuntunano /etc/mysql/my.cnf## On CentOSnano /etc/my.cnf |
You may firstly need to edit IP binding configuration (especially in Ubuntu). Change 127.0.0.1 at bind-address with the IP of your Master server
|
1
2
3
4
|
bind-address = 127.0.0.1## change 127.0.0.1 with IP address of your Master nodebind-address = 111.111.111.111 |
Step 2 – Now put these lines right after the [mysqld] section:
|
1
2
3
4
5
6
7
8
|
server-id=1binlog-do-db=databasenamerelay-log=/var/lib/mysql/mysql-relay-binrelay-log-index=/var/lib/mysql/mysql-relay-bin.indexlog-error=/var/lib/mysql/mysql.errmaster-info-file=/var/lib/mysql/mysql-master.inforelay-log-info-file=/var/lib/mysql/mysql-relay-log.infolog-bin=/var/lib/mysql/mysql-bin |
Change databasename with the database name you want to replicate / copy it to the Slave server. You can include more than one database by repeating this line for all of the databases you will need. I use servermomdb as my database name for this example. Screenshot pic:
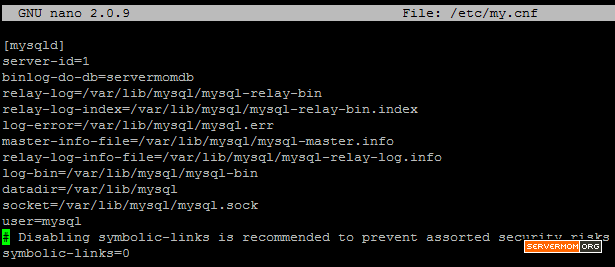
Once done, save changes and exit the editor. In Nano it is Control+O then Control+X.
Step 3 – You can now restart mysql service:
|
1
|
service mysql restart |

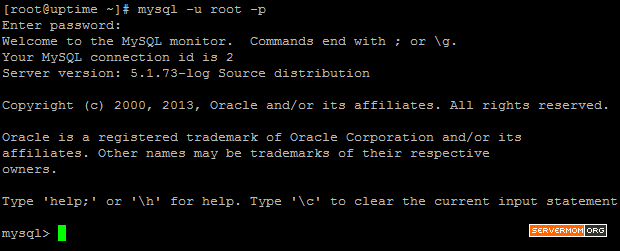
Step 4 – Login to MySQL shell as root using password you defined :
|
1
|
mysql -u root -p |
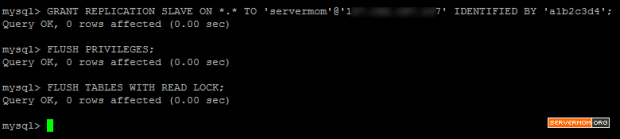
Step 5 – Here’s a little bit tricky part. Pay attention closely to each command is issued inside MySQL shell. What you are going to do is: to create the slave user and grant privileges for replication task, flushing privileges and lock the database.
|
1
2
3
|
GRANT REPLICATION SLAVE ON *.* TO 'replicauser'@'222.222.222.222' IDENTIFIED BY 'replicapass';FLUSH PRIVILEGES;FLUSH TABLES WITH READ LOCK; |
Do not forget to replace replicauser, 222.222.222.222 and replicapass accordingly.
Here’s an illustration of mine. I use servermom as user and a1b2c3d4 as password:
Step 6 – You’ll need to find out the mysql-bin name and its Position then note it down (I simply open up Notepad and note it there). Still in MySQL shell, use command below:
|
1
|
SHOW MASTER STATUS; |
it should give you output similar to this:
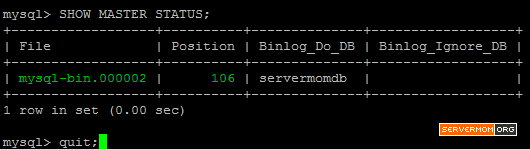
In my case I have to note the mysql-bin.000002 and 106, yours will be different.
Step 7 – You can now exit MySQL shell:
|
1
|
quit; |
and continue by exporting the database file you wish to copy it to the Slave:
|
1
|
mysqldump -u root -p databasename > databasename.sql |
change databasename with yours.

It’s time to transfer / copy your database to the Slave server. You can do this using SCP.
This is the easiest method available. The command is:
|
1
|
scp -P 22 /root/databasename.sql root@222.222.222.222:/root/ |
Change 22 with specific SSH port (if you changed it) of your Slave server., also changedatabasename.sql and 222.222.222.222 with yours. Example of mine:

Leave the first server (Master node) for a while and now login to your second server which is the Slave node as root. Issue all command in this section only on Slave node.
Step 1 – Edit MySQL configuration file using your favorite text editor like vi or Nano. Command below uses Nano editor:
|
1
2
3
4
5
|
## On Ubuntunano /etc/mysql/my.cnf## On CentOSnano /etc/my.cnf |
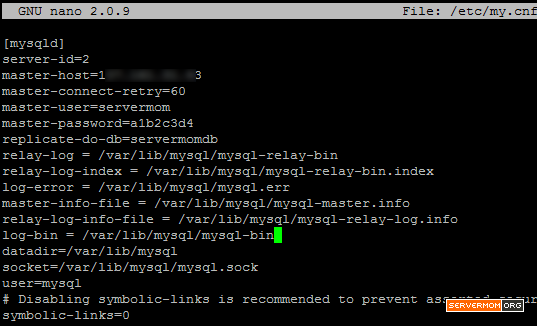
Step 2 – Now let’s configure MySQL configuration file in your Slave server. Copy paste these configuration right after the [mysqld] section:
|
1
2
3
4
5
6
7
8
9
10
11
12
|
server-id=2master-host=111.111.111.111master-connect-retry=60master-user=replicausermaster-password=replicapassreplicate-do-db=databasenamerelay-log = /var/lib/mysql/mysql-relay-binrelay-log-index = /var/lib/mysql/mysql-relay-bin.indexlog-error = /var/lib/mysql/mysql.errmaster-info-file = /var/lib/mysql/mysql-master.inforelay-log-info-file = /var/lib/mysql/mysql-relay-log.infolog-bin = /var/lib/mysql/mysql-bin |
Change 111.111.111.111 with IP address of Master server. Change replicauser, replicapass and databasename with yours. Example:
Save changes and exit text editor which in Nano it is Control+O then Control+X.
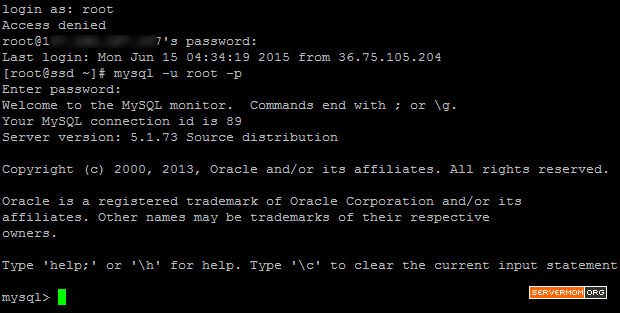
Step 3 – Login to MySQL shell as root:
|
1
|
mysql -u root -p |
pic:
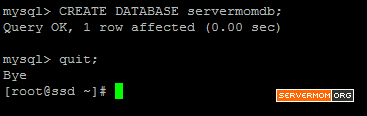
Step 4 – Create new database with same name then exit MySQL shell:
|
1
2
|
CREATE DATABASE databasename;quit; |
replace databasename with your own real database name. Example:
Step 5 – Restore database you have transferred previously using this command:
|
1
|
mysql -u root -p databasename < databasename.sql |
Step 6 – Restart MySQL server to apply / load changes:
|
1
|
service mysqld restart |
example:

Step 7 – Login back to MySQL shell as root to do some important tasks:
|
1
|
mysql -u root -p |
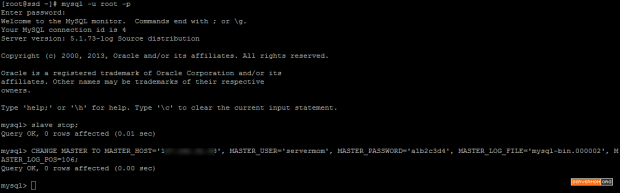
First task is to stop the Slave so you can define where to look for Master log file.
|
1
2
|
slave stop;CHANGE MASTER TO MASTER_HOST='111.111.111.111', MASTER_USER='replicauser', MASTER_PASSWORD='replicapass', MASTER_LOG_FILE='mysql-bin.000001', MASTER_LOG_POS=12345; |
Change 111.111.111.111, replicauser, replicapass, mysql-bin.000001 and 12345 with yours. Example of mine:
Once done, now you can start Slave and show its status with this command:
|
1
2
|
slave start;show slave status\G |
It will give you an output similar to this:
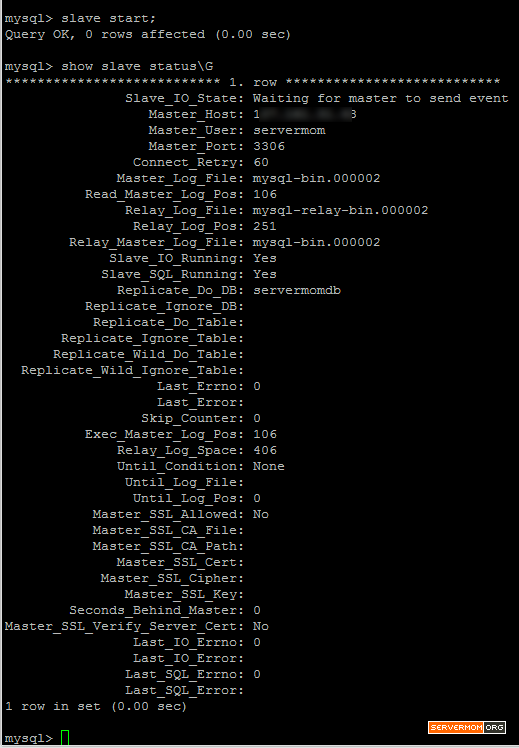
If you see something similar to above pic then you are success. There are few lines to pay more attention with: Last_Error will be blank, and Slave_IO_State will report “Waiting for master to send event“, also the Seconds_Behind_Master will indicate how far behind it is. If you see those then congratulation you have configured MySQL slave replication.
You can now exit MySQL shell:
|
1
|
quit; |
Leave Slave server for a while and go back to Master server. Login back to MySQL shell at Master server:
|
1
|
mysql -u root -p |
this is important, as you locked the tables of MySQL database in Master server, you can now safely unlock it:
|
1
2
|
UNLOCK TABLES;quit; |
pic:

In production environment this is very important to make sure database between Master and Slave can be synced easily, but visitors / users of your websites will not able to make changes (post comment, add article, etc) during your time setting up MySQL replication above. But however you’ll not suffer any downtime during the process. That’s it.
Additional Note:
Once Master – Slave mode is enabled and succeed, the MySQL root password of Slave server will change following its Master.
If you accidentally change a row of data on your slave or if there is an issue in connecting, try issuing this command inside MySQL shell:
|
1
2
3
|
STOP SLAVE;SET GLOBAL SQL_SLAVE_SKIP_COUNTER = 1;START SLAVE; |
Do not forget to follow me on twitter to get notified quicker when a new article is posted. Have fun!